
Running ReportsReporting InterfacesSI5 provides a total of seven different reporting interfaces, each with their own capabilities and associated reports. This table provides a summary of the various interfaces:
Reporting CenterThe Reporting Center is a stand-alone interface that provides the most power for running and creating reports. From the Reporting Center, you can: · Run any report in the reports list · Customize the reports list including report definitions · Change global report settings · Create and edit custom reports · Import and export custom reports · Import custom excel reports · Run a report on the difference between two revisions (“delta” report) To open the Reporting Center, go to Navigator > Tools > Reporting Center. To run a report from within the Reporting Center, follow these steps: 1. select one or more projects from the D-Tools Projects list a. If more than one project is selected, the data (items) from all projects will be combined 2. You can also select a previous revision to run a report on 3. In the Reports List, expand the report categories and double-click on the report name to run the report 4. This will run the report using the default report definition 5. To run the report using a different report definition, click on the + symbol next to the report name and double-click on the report definition you wish to run 6. To run a report with filters (see below), right-click and choose “Run Report with Filters” Global Report SettingsGlobal report settings are changed via the Reporting Center and affect the way all reports in the Reports List and Revision Manager run. CLICK HERE for full information. ProjectsFrom within a project (Text, Visio or AutoCAD), you can: · Run any report in the reports list (on current project only) · Run an SI4 legacy report on the current project (see below) Note that you cannot modify report definitions from this interface – use the Reporting Center for that. To open the projects reporting interface, go to D-Tools > Reports from within an open project. To run a report from within projects, follow this step: 1. In the Reports List, expand the report categories and double-click on the report name to run the report a. This will run the report using the default report definition b. To run the report using a different report definition, click on the + symbol next to the report name and double-click on the report definition you wish to run c. To run a report with filters (see below), right-click and choose “Run Report with Filters” NavigatorThe Navigator also has a Reports tab that allows you to do the following · Run any report in the reports list (on the selected project from projects tab) Note that you cannot modify report definitions from this interface – use the Reporting Center for that. To run a report from within the Navigator, follow these steps: 1. Go to the Projects tab and select a project 2. Go to the Reports tab 7. In the Reports List, expand the report categories and double-click on the report name to run the report a. This will run the report using the default report definition b. To run the report using a different report definition, click on the + symbol next to the report name and double-click on the report definition you wish to run c. To run a report with filters (see below), right-click and choose “Run Report with Filters” Revision ManagementBusiness Manager users have access to Change Order reports via the Revision Management tab. This interface has these capabilities: · Reports can be run on selected differences between two project revisions. User has control over which items appear and which do not · Change Order reports can be customized using the Report Designer, which is available through the Reporting Center · Reports available here are not limited to Change Orders. In fact, any custom report can be made to run through this interface. See Special Report Types for more details. To run a report from the Revision Management tab, follow these steps: 1. Go to the Projects tab and select the project with revisions 2. Check out the project 3. Go to Business Manager > Revision Management tab 4. Choose the two revisions to compare (at the bottom) 5. Select ‘Run’ 6. Go to View > Equipment and Labor and select items to include 7. Go to View > Packages and select packages to include 8. Go to Reports (inside Revision Management) and select the report you wish to run i. Mouse over to the right for additional report definition options 9. Confirm product selections and hit Create to run report Sales OrderBusiness Manager users have access to Sales Order reports via the Sales Order tab. This interface has these capabilities: · Run a sales order report based in items in the selected sales order Note that sales order reports cannot be customized. To run a sales order report, follow these steps: 1. Go to the Projects tab and select the project 2. Go to Business Manager > Sales Orders tab 3. Select the sales order from the list at the bottom (or create) 4. Select Reports > Sales Order by Location from the menu Work OrdersBusiness Manager users have access to Work Order reports via the Sales Order tab. This interface has these capabilities: · Run work order reports based on the items in the selected work order Note that work order reports cannot be customized. To run a work order report, follow these steps: 1. Go to the Projects tab and select the project 2. Go to Business Manager > Work Orders tab 3. Select the work order from the list at the bottom (or create) 4. Select Reports from the menu and pick the report you wish to run (for example Work Order by Location) OrderToolsOrderTools is an old feature for creating purchase orders that will be replaced in a future version. It is only available from within an open project and has these capabilities: · Create a purchase order report for selected products for a given representative · Manage purchasing representatives · Contact information · Products carried To run a purchase order report from within OrderTools, follow these steps: 1. Open the project in Text, Visio, or AutoCAD 2. Go to D-Tools > OrderTools > Purchase Orders 3. Click on New PO to create a new purchase order 4. Click on Preview, Print or email to run the report Filtering Reports
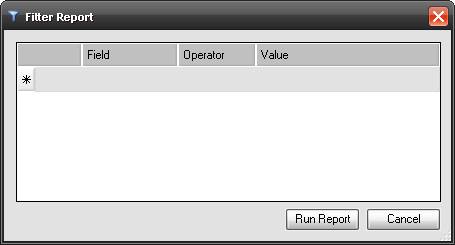
If you want to filter the project data before running a report, right-click on the report name and select Run Report with Filters. The Filter Report dialog will appear.
On the row with an asterisk, click on the field column to select which data field you wish to filter by. Similarly, click on the Operator and Value fields to determine how this data field will be filtered.
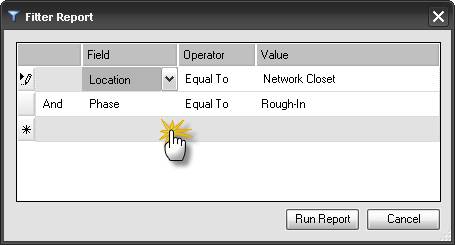
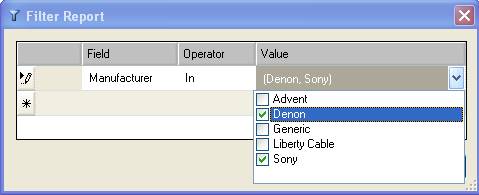
You can select multiple fields to filter by. Each row of the filter is joined by either an AND or an OR statement, selected in the column on the far left. The example above will filter by Location = Network Closet AND Phase = Rough-In. Click [Run Report] to run the report with filters. Leveraging the “In” operatorThe “In” operator is a way to create a single filter for a field where it may match multiple values. Use this instead of multiple AND or OR rows.
Exporting ReportsOnce run, reports can be exported to any of the following formats by clicking on the appropriate export button ·
Adobe pdf ·
Rich text format (rtf) ·
HTML ·
Excel (xls) Excel export optionsWhen exporting to excel, there
are a number of report options which affect the way the data appears in
excel. Click on the Excel Report Settings button
Exporting to Word via rtfTo import a report into MS Word for continued editing, follow these steps: 1) Click
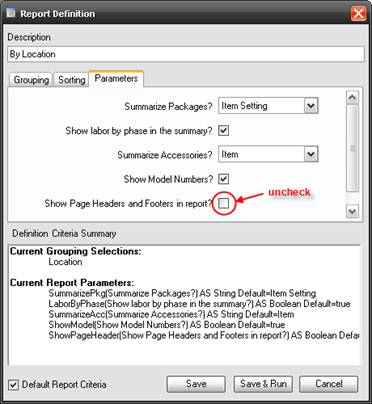
on the Export to Rich Text File icon, ( 2) Open Microsoft Word 3) Go to Insert > File, select “All Word Documents” in the file type dropdown, and browse to the rtf file. Using your own Word templatesIf you want to fine tune the look of your reports in Word, you can do this by running these reports with no headers or footers, then inserting into your own custom-made Word template. Follow these steps: 1) Create a Word template with the desired headers and footers you want to use.
Settings\D-Tools\SI5\Other Files). See SI5 Proposal Template 1.dot. VISTA: C:\ProgramData\D-Tools\SI5\Other Files 2) Create a custom report definition (see below) and uncheck the “Show Page Header and Footer” parameter.
3) Run the report using the custom report definition. 4) Export to Rich Text Format (see above) 5) Create a new Word document based on your custom template. 6) Go to Insert > File and browse to the rtf document (see above)
SI4 Legacy ReportsIf you have SI4 and SI5 installed on the same computer, you can run any non-Business Manager SI4 report, including custom reports, on an open project. To run an SI4 legacy report, follow these steps: 1. Open the project in Text, Visio or AutoCAD 2. Go to D-Tools > Reports 3. Go to File -> Legacy Reporting System in the menu bar and the SI4 Reports interface will open.
See the SI4 Users Guide for more details on how to use this interface. |
|||||||||||||||||||||||||||||||||||||||||||||||||||||||
![]()